I had gotten inspired to take on our babies room at 6 1/2 months pregnant. (I think I’m going through the nesting period.)
I had seen so many BEAUTIFUL faux Barnwood walls, that I had to have one. I started getting the spare bedroom cleaned out
(before)
 (After paint)

So next began my endeavor to find “faux peel and stick barnwood”. If you can find some of that, it look halfway decent and not pay $1,400… I might just kiss your hiney.
IT. WAS. IMPOSSIBLE.
I ordered vinyl peel and stick flooring from Lowe’s, waited a week for it to come in, and it looked terrible. It was all shiney, you wouldn’t have seen any grooves PLUS they sent me the glue on kind instead of the “peel and stick”… so I took it back.
Time to scramble and come up with a new option. The next day, I drove all around my town looking for barns/buildings that were falling in to see if I could find the owners and ask them if I could have their wood. I stopped after 3 people turned me down. Plus, I was kind of nervous about bugs… and sticking them over my babies head. (The $1,500 Stickwood was looking MIGHTY good at about that time.)
So I scratched that idea. My husband was off work the next day, so I decided to add him to the venture. My next plan was to buy wood from Lowes and distress it like the tutorial here.
So the process begins.
First we found a good looking, even board. The 8′ 6″x1″ white pine was what we went with.
We figured how much wood we would need for our wall, and it turns out my husband is an expert square foot figurer, seeing as we only had 1 extra board after the wall was complete.
We thought out a pattern that would go well with our 11 foot wide room and cut the boards, writing what size they were on the back of each plank.
8′ and a 3′
2′ 4′ and a 5′
4′ 3′ and a 4′
all totaling 11′, you get the picture, etc. etc.
We laid the boards out and made sure it would fit our wall before we started staining.

Next, we stained the wood planks, starting from the 8′ boards to the 2′. It was a sunny, warm day so we were able to lay them out to dry and by the time we got done staining the 2′ boards, I could start dry brushing the white paint on. (You can check the link above on how to distress wood, we used everything exactly as was mentioned there except the DIY wood stain.)

After the white paint dried, I took the steel wool (with gloves!) and rubbed down all of the pieces. Next, we took all of the boards to the room and laid them out by size, and wrote out the exact pattern we wanted (above) so it was easy to grab the pieces and nail them up. All of the pieces fit perfectly on the wall because we made sure to measure them as they were laid out on the pavement to be sure they equaled 11′. Also, you see those blue chalk lines on the wall? Instead of nailing up new boards to nail THESE planks into causing the planks to overhang the floor molding, my husband used his stud finder to find the studs in the walls and we chalked them and was easily able to nail right into a stud when hanging the boards. We also wanted to start hanging from the top, so that when we got to the bottom and had to cut a board in half to make it fit, it wouldn’t look weird. (In case we messed up!)
 We ended up having to cut our bottom board to a 2″ and stain and paint those after we got all the boards up, because we weren’t sure exactly what that measurement would end up being after it was all said and done. We used 2 1/2″ nails in our nail gun and the boards felt very stable on the wall! I didn’t cover the nail holes with anything, because I think it looks better with them!
Here is the finished product!


It’s been a while since my last post, I hope you all are doing well and maybe I will get back into this blogging thing! Have a great day everyone!

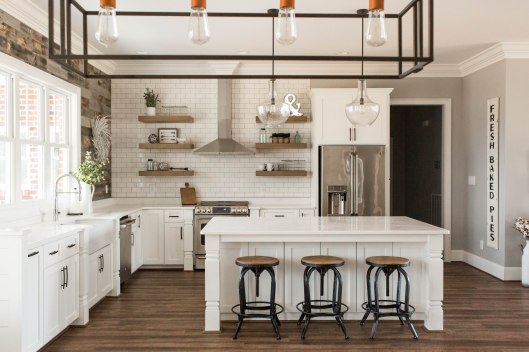
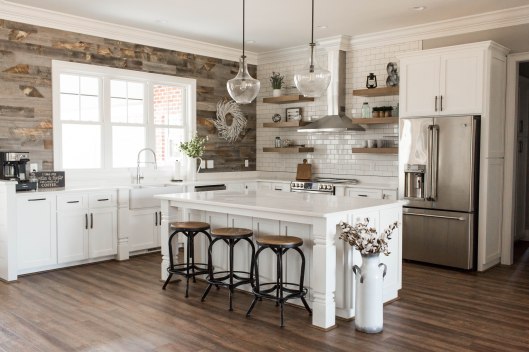
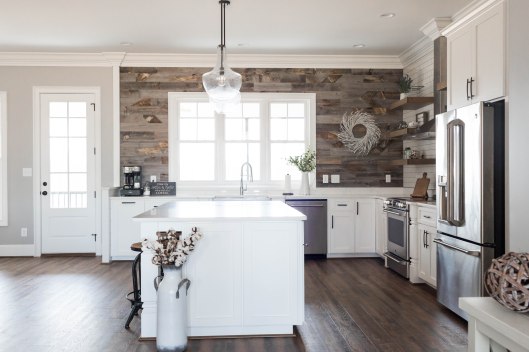


 Finished product!